Kamis, 23 Januari 2025

Free Plywood Dinghy Plans

0 komentar

Free Plywood Dinghy Plans: Your Guide to Building Your Own Boat

Hey there, fellow DIY enthusiasts! So you're dreaming of building your own boat, huh? That's awesome! There's something incredibly satisfying about crafting something with your own two hands, especially something as cool as a plywood dinghy. And the best part? It doesn't have to break the bank. This guide will walk you through finding free plywood dinghy plans and building your own little watercraft. Get ready to get your hands dirty (and maybe a little wet!).

Why Choose a Plywood Dinghy?

Plywood is a fantastic material for boatbuilding, especially for beginners. It's relatively inexpensive, readily available at most home improvement stores, and surprisingly strong when used correctly. Plus, the construction process is generally easier than using fiberglass or other more complex materials. A plywood dinghy is perfect for:

  • Exploring calm waters: Think lakes, bays, and slow-moving rivers.
  • Fishing: A stable platform for a quiet afternoon of angling.
  • Tendering: Perfect for getting from a larger vessel to shore.
  • Recreational use: Just a fun way to get out on the water!

Remember though, a plywood dinghy is generally not suitable for rough seas or high speeds. It's designed for calm waters and leisurely use.

Finding Free Plywood Dinghy Plans Online

The internet is a goldmine of information, including free boat plans! However, sifting through the plethora of websites can be overwhelming. Here's what to look for and where to start your search:

Reliable Sources for Boat Plans:

Don't just grab the first plan you see! Check the source's reputation. Look for sites with detailed instructions, clear diagrams, and positive reviews from other builders. Some places to start your search include:

  • Boatbuilding forums and communities: These online communities often have members who share their plans and offer advice.
  • Websites dedicated to boatbuilding: Many websites specialize in providing boat plans, some offering free options.
  • YouTube tutorials: While not always providing complete plans, many YouTubers demonstrate the building process of plywood dinghies, offering valuable insights.
  • Classic boat plans websites: Sometimes, you can find older, free plans that are still perfectly suitable for building a simple dinghy.

What to Look For in a Good Set of Plans:

Before you start downloading, make sure the plans are comprehensive and easy to understand. Here's a checklist:

  • Detailed material list: This should specify the type and quantity of plywood, hardware, and other materials you'll need.
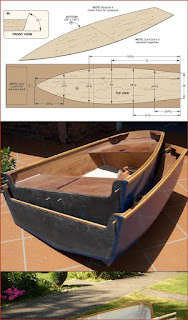
  • Clear diagrams and drawings: The plans should have easily understandable diagrams showing the shape and dimensions of each part of the boat.
  • Step-by-step instructions: The instructions should be clear and concise, leading you through the building process logically.
  • Specifications and dimensions: The plans should include the overall length, beam (width), and depth of the dinghy.
  • Recommended plywood thickness: This is crucial for the strength and durability of your boat.

Essential Tools and Materials

Once you've found your plans, gather your materials. This is where careful planning pays off. Having everything on hand will make the building process much smoother.

Tools You'll Need:

  • Circular saw or jigsaw: For cutting the plywood sheets.
  • Drill and drill bits: For drilling pilot holes and attaching parts.
  • Screwdriver (or impact driver): For fastening screws.
  • Clamps: Many, many clamps! You'll need these to hold the pieces together while the glue dries.
  • Measuring tape and square: Accurate measurements are crucial.
  • Sandpaper and sanding block: For smoothing out surfaces.
  • Safety glasses and hearing protection: Always prioritize safety!

Materials You'll Need:

The specific materials will depend on your chosen plans, but generally you'll need:

  • Marine-grade plywood: This is essential! Standard plywood will rot quickly in the water.
  • Epoxy resin and hardener: For sealing the plywood and adding strength.
  • Wood screws: Use stainless steel or bronze screws to prevent rust.
  • Wood glue: A good quality waterproof wood glue is a must.
  • Paint or varnish: To protect the plywood from the elements.
  • Hardware for oars or a motor (if applicable): Choose the right hardware based on your dinghy design.

Building Your Dinghy: A Step-by-Step Overview

Building a plywood dinghy takes time and patience. Each plan will have its own instructions, but generally the process involves these steps:

  1. Cutting the plywood: Carefully cut the plywood pieces according to the plans, paying close attention to accuracy.
  2. Assembling the hull: This often involves joining the bottom and sides of the boat, using glue and screws. Clamps are your best friend here!
  3. Adding reinforcements: Many plans call for reinforcing the hull with additional pieces of plywood or fiberglass cloth.
  4. Sealing and finishing: Once assembled, seal all joints and surfaces with epoxy resin to make the boat waterproof.
  5. Painting or varnishing: Protect your beautiful creation with a durable paint or varnish.
  6. Adding hardware: Install any necessary hardware, such as oarlocks or a motor mount.

Remember, take your time, follow the plans meticulously, and don't be afraid to ask for help if you get stuck. There are many online communities dedicated to boatbuilding where you can find advice and support.

Commonly Asked Questions

Here are some frequently asked questions about building plywood dinghies:

  • Q: What type of plywood should I use? A: Always use marine-grade plywood. It's specifically designed to resist rot and water damage.
  • Q: How long does it take to build a plywood dinghy? A: This depends heavily on the size and complexity of the dinghy, as well as your experience level. It could take anywhere from a few weeks to several months.
  • Q: Do I need any special skills? A: Basic woodworking skills are helpful, but it's not necessary to be a professional. Careful attention to detail and patience are more important.
  • Q: Can I use a different type of adhesive? A: While some adhesives might work, epoxy resin and marine-grade wood glue are highly recommended for their waterproof properties.
  • Q: How do I register my homemade boat? A: Registration requirements vary by location. Check with your local boating authorities for specific guidelines.
  • Q: What if I make a mistake? A: Don't worry! Mistakes happen. Take a deep breath, assess the situation, and see if you can correct it. Sometimes, starting over on a small section is easier than trying to salvage a major error.

Happy building, and fair winds!

Portable Stitch and Glue Kayak Plans

0 komentar

Build Your Own Portable Stitch-and-Glue Kayak: A Comprehensive Guide

Dreaming of exploring hidden waterways but intimidated by the cost of a factory-made kayak? Consider building your own portable stitch-and-glue kayak! This rewarding project blends affordability with customization, allowing you to craft a vessel perfectly suited to your needs and adventures. This detailed guide walks you through every step, from selecting plans to enjoying your maiden voyage.

Choosing the Right Stitch-and-Glue Kayak Plans

The foundation of your project lies in selecting the right plans. Numerous online resources and books offer stitch-and-glue kayak plans catering to various skill levels and desired kayak styles. Begin by evaluating your experience level. A simpler design with fewer curves and components is ideal for beginners. Consider the kayak's intended useâ€"leisurely paddling, fishing, or whitewaterâ€"as this dictates hull shape and size. Examine the included details meticulously; clear diagrams, comprehensive instructions, and a detailed materials list are crucial for a smooth build.

Factors to Consider When Selecting Plans

Don't rush this decision! Spend time researching and comparing different designs. Key factors include:

  • Length and Width: Determine the best size for your body and intended use.
  • Hull Design: Consider the stability, speed, and tracking capabilities of different hull shapes.
  • Material Recommendations: Check if the plans specify particular materials, ensuring their availability and cost-effectiveness.
  • Level of Detail: Choose plans with clear, easy-to-follow instructions and diagrams.

Gathering Your Materials and Tools

Once you've secured your plans, meticulously gather the necessary materials. This typically involves purchasing marine-grade plywood, fiberglass cloth, epoxy resin, and various small hardware items like screws and sealant. Accurate measurement is paramount; carefully double-check your cuts to ensure a proper fit. Beyond the core materials, you'll need essential tools such as a jigsaw, clamps, sandpaper, brushes, and safety gear, including gloves and eye protection. Investing in quality tools will greatly improve the accuracy and efficiency of your build.

Essential Tools for Kayak Construction

Before you begin, ensure you have these tools on hand:

  • Jigsaw
  • Clamps (various sizes)
  • Sandpaper (various grits)
  • Epoxy resin and hardener
  • Fiberglass cloth
  • Mixing cups and stirring sticks
  • Brushes (for applying epoxy)
  • Safety glasses and gloves
  • Measuring tape and square

The Stitch-and-Glue Process: A Step-by-Step Guide

The stitch-and-glue method is known for its relative simplicity. Begin by cutting the plywood pieces according to your plans. Next, carefully stitch the pieces together using a strong nylon thread, creating the kayak's basic shape. Pay close attention to the stitching pattern, ensuring even tension across all seams. Once stitched, meticulously apply layers of fiberglass cloth and epoxy resin to seal and reinforce the seams, transforming the stitched structure into a durable, waterproof hull. Allow ample drying time between each epoxy application, following the manufacturer's instructions closely.

Finishing Touches and Maiden Voyage

After the epoxy has fully cured, carefully remove the stitching. Sand the hull smooth, paying attention to any imperfections. Apply a final coat of sealant for added protection. Install any necessary components like seats, bulkheads, and hatches. Finally, launch your kayak! Enjoy the fruits of your labor, exploring waterways and relishing the satisfaction of building your own vessel. Remember to always prioritize safety and wear a personal flotation device (PFD) when kayaking.

Stitch and Glue Canoe Plans

0 komentar

Building Your Own Stitch-and-Glue Canoe: A Comprehensive Guide

The rhythmic tap-tap-tap of a mallet, the satisfying scent of fresh wood and epoxy, the anticipation of gliding across calm watersâ€"building your own stitch-and-glue canoe offers a deeply rewarding experience. This time-tested method combines the elegance of traditional wooden boatbuilding with the accessibility of modern materials. Forget the complex steam-bending and intricate joinery; stitch-and-glue allows you to create a beautiful, durable canoe with relatively simple tools and techniques. This guide will walk you through the process, empowering you to build your own vessel and enjoy the journey as much as the destination.

Choosing Your Plans and Materials

Your canoe-building adventure begins with selecting the perfect plans. Numerous sources offer downloadable plans, ranging from simple designs ideal for beginners to more intricate models for experienced builders. Carefully review the plans, paying close attention to the skill level required and the dimensions of the finished canoe. Consider your intended useâ€"will this canoe navigate gentle lakes or tackle challenging whitewater? This will significantly influence your choice of design and materials.

Essential Materials

Once you’ve selected your plans, gather your materials. You'll need:

  • Wooden strips: Typically cedar, mahogany, or spruce, pre-cut to the specified dimensions in your plans.
  • Epoxy resin and hardener: This forms the waterproof glue that binds the wooden strips together.
  • Stitch-and-glue thread: A strong, marine-grade thread used to initially hold the strips in place.
  • Fiberglass cloth: Used to reinforce the hull and create a smooth, watertight finish.
  • Wood filler: To smooth out any imperfections after the fiberglass application.
  • Paint or varnish: To protect the canoe from the elements.
  • Various tools: Including clamps, a mallet, scissors, sandpaper, brushes, and safety equipment.

The Stitch-and-Glue Process: A Step-by-Step Guide

The stitch-and-glue method itself is deceptively straightforward. Begin by laying out your wooden strips according to the plans. Precise alignment is crucial for a strong, symmetrical hull. Using the stitch-and-glue thread, carefully stitch the strips together, following the patterns defined in your plans. Ensure consistent tension throughout the stitching process to prevent gaps or unevenness. Once the stitching is complete, the real magic begins. You'll now apply layers of epoxy resin, meticulously coating each seam. The epoxy will saturate the wood and create a strong bond.

Adding Strength and Durability

After the epoxy cures, carefully remove the stitching. This reveals a strong, lightweight frame ready for reinforcement. Apply layers of fiberglass cloth, further strengthening the hull and creating a smooth, watertight surface. Once the fiberglass has cured, you can sand the canoe to remove any excess material and achieve a refined finish. Wood filler can then be used to address any remaining imperfections before you apply your chosen finish â€" paint or varnish.

Finishing Touches and Launching Your Canoe

The final stages involve adding any necessary details, such as seats, thwarts, and gunwales. Pay close attention to the details outlined in your plans. A well-finished canoe should reflect your craftsmanship and pride in the project. Once the finish has fully cured, it’s time for the moment you’ve been waiting forâ€"launching your handcrafted canoe. Glide across the water, enjoying the quiet satisfaction of having built something beautiful and functional with your own two hands. Remember to always prioritize safety and wear appropriate personal floatation devices.

Building a stitch-and-glue canoe is a journey of discovery. It’s a rewarding process that allows you to connect with nature and your own creativity. While patience and attention to detail are crucial, the resultâ€"a custom-built canoeâ€"is well worth the effort.

12ft Plywood Sailboat Plans

0 komentar

Beyond the Boards: Unveiling the Untapped Potential of 12ft Plywood Sailboat Plans

The allure of building a sailboat from scratch, especially from readily available plywood, is undeniable. 12ft plywood sailboat plans offer a fantastic entry point, but beyond the readily available instructions, lies a world of unexplored possibilities. This article delves into those often-overlooked aspects, addressing questions and concerns seldom found in typical build guides.

The "Why" Beyond the Build: Rethinking the 12ft Sailboat

Building a boat isn't just about following plans; it's about understanding the "why" behind each design choice. This is where the true learning and innovation begin.

Q: Why settle for a simple, traditional design when the 12ft platform allows for experimentation?

A: Most 12ft plywood sailboat plans adhere to classic designs for simplicity. But consider this: could you incorporate elements of modern hydrodynamics? Could you experiment with different hull shapes optimized for specific conditions (e.g., a flatter bottom for shallow water, a more V-shaped hull for choppier seas)? This isn't about reinventing the wheel, but rather about fine-tuning it based on your local waters and sailing preferences. Exploring resources like naval architecture textbooks (e.g., "Principles of Naval Architecture" by Comstock) can open up these avenues.

Q: How can I make my 12ft plywood sailboat stand out, both aesthetically and functionally?

A: Think beyond the standard varnish finish. Explore alternative sustainable coatings like linseed oil or even eco-friendly epoxy paints. Consider incorporating reclaimed wood accents or laser-cut details for a unique aesthetic. Functionally, investigate different sail materials (e.g., ripstop nylon for increased durability) and rigging configurations to optimize performance. Even small tweaks can significantly alter the sailing experience.

Beyond the Plans: Materials, Methods, and Mastery

The quality of materials and the skill of the builder are crucial. This section explores these less-discussed factors that can significantly impact the final product.

Q: What plywood is truly optimal, and why does it matter so much?

A: Marine-grade plywood is essential, but even within this category, variations exist. Consider the type of wood veneer (e.g., Okoume is popular for its strength-to-weight ratio) and the quality of the bonding. A higher-quality plywood might cost more upfront, but it translates to a stronger, more durable vessel in the long run. Reading independent reviews and comparing different brands' specifications will guide you here. Remember to account for the climate in your region â€" some plywoods perform better in humid conditions than others.

Q: Can I integrate sustainable and recycled materials into my build?

A: Absolutely! Exploring sustainable options is both environmentally responsible and allows for creative problem-solving. Reclaimed wood for interior components, recycled hardware, and even upcycled sails from other boats are all possibilities. This approach not only reduces your environmental footprint but also gives your boat a unique character and story.

Real-World Stories and Unexpected Learnings

Learning from the experiences of others provides invaluable insights.

Story 1: A seasoned boatbuilder recounts how using a slightly different epoxy resin resulted in a more water-resistant hull, highlighting the importance of meticulous research into materials.

Story 2: An amateur builder shares how incorporating a simple water ballast system significantly improved their 12ft sailboat's stability in challenging conditions, demonstrating how small innovations can yield considerable benefits.

These anecdotes illustrate that building a 12ft plywood sailboat is a journey of continuous learning and adaptation. Embrace the unexpected, document your process, and share your experiences to contribute to the ever-evolving knowledge base surrounding these delightful small craft.

Conclusion: Charting Your Own Course

12ft plywood sailboat plans are more than just blueprints; they are springboards for innovation and personal expression. By questioning assumptions, exploring alternative materials and techniques, and learning from others' experiences, you can build a boat that is not only functional and seaworthy but also a testament to your creativity and craftsmanship. So, grab your tools, embrace the challenge, and set sail on your unique shipbuilding adventure.

Selasa, 21 Januari 2025

DIY plywood dinghy for beginners with easy construction

0 komentar
DIY plywood dinghy for beginners with easy construction

Plywood Dinghy Dreams: Beyond the Build Manual

Building a plywood dinghy is a classic DIY project, promising nautical adventures and hands-on learning. But beyond the standard how-to guides, a world of unexplored possibilities exists for beginners. This article delves into those often-overlooked aspects, offering fresh perspectives and creative solutions for a truly unique build experience.

Q&A: Tackling the Unconventional in Plywood Dinghy Construction

Beyond the Plans: Can I Design My Own Dinghy?

Most beginners stick to readily available plans. But what if you envision a dinghy tailored to your specific needs and aesthetic? While requiring more design software proficiency (free options like FreeCAD exist!), designing your own opens a world of customization. Imagine a dinghy with integrated storage for your fishing gear or a shallow-draft hull perfect for exploring tidal flats. This empowers you to learn about naval architecture fundamentals, a rarely explored aspect of the project. Remember, starting small and simple is key; begin with modifying existing plans before jumping into full-blown design.

Material Magic: Plywood Alternatives and Innovations?

Standard marine plywood is the go-to, but are there greener, lighter, or stronger alternatives? Consider using sustainably sourced plywood with a higher-quality marine-grade finish. Exploring alternatives like fiberglass-reinforced plywood or even sustainable bamboo plywood (depending on the intended use and desired durability) opens up new avenues for experimentation. Researching the environmental impact of your choices adds a new layer of responsibility and learning to your project.

Beyond the Basics: What About Advanced Construction Techniques?

Most plans focus on simple lap joints and screws. But what about exploring more advanced techniques like scarf joints for seamless hull construction, or utilizing epoxy resin for increased strength and water resistance? These techniques, while slightly more complex, result in a stronger and more refined vessel. Websites and YouTube channels dedicated to boatbuilding offer tutorials on these advanced methods, making them accessible to dedicated beginners. This will elevate the project beyond simple construction into a real craft.

Real-World Stories: Lessons Learned and Innovative Solutions

The "Upcycled" Dinghy: John, a passionate DIYer, didn't just build a dinghy; he *upcycled* one. He sourced discarded plywood from a local construction site, carefully selecting usable pieces. This not only reduced his environmental footprint but also challenged him to be more resourceful and creative in his design process. The result? A unique, character-filled dinghy that tells a story beyond the simple construction. He documented his experience on a blog, inspiring others to think outside the box.

The "Modular" Marvel: Sarah, a teacher, incorporated the dinghy build into a class project. She designed the dinghy with modular components, allowing students to contribute individually to specific sections. This facilitated collaborative learning and broke down the project into manageable tasks, making it less daunting for beginners. The final product was a testament to teamwork and a testament to the power of collaborative learning.

Educational and Professional Applications

The plywood dinghy project extends far beyond a simple hobby. For educational institutions, it provides a hands-on platform to teach practical skills in woodworking, geometry, engineering, and environmental awareness. For woodworking craftsmen, it offers a chance to showcase their skills and explore unconventional materials and techniques. It allows for exploration of design principles through modifications to existing plans or by creating new designs from scratch.

Beyond the Boat: The skills learnedâ€"measuring, cutting, joining, finishingâ€"are transferable to countless other DIY projects. The problem-solving and resourcefulness honed during the build will prove invaluable in future endeavors.

Building a plywood dinghy is more than just constructing a boat; it's a journey of learning, creativity, and personal fulfillment. By venturing beyond the conventional and exploring the unconventional, you can craft a truly unique and rewarding experience. So, grab your tools, embrace the challenge, and set sail on your own DIY adventure!

Easy-to-follow boat building plans for a plywood sailboat

0 komentar
Easy-to-follow boat building plans for a plywood sailboat

Unlocking the Secrets of Plywood Sailboats: Beyond the Blueprint

Building your own sailboat from plywood plans can be a deeply rewarding experience, blending craftsmanship, engineering, and a touch of adventure. But beyond the readily available plans and step-by-step guides, a whole universe of less-discussed considerations can make or break your project. This isn't just about following instructions; it's about understanding the nuances and finding creative solutions to common challenges. Let's dive into some rarely explored aspects, framed as a series of questions and answers.

The Unsung Heroes: Material Selection and Optimization

Beyond the Grade: How does wood species truly impact performance?

Most plans simply specify "marine-grade plywood." But did you know that the specific species of wood used in the plywood significantly affects the boat's weight, strength, and even its sailing characteristics? For example, Okoumé plywood, a common choice, offers a good strength-to-weight ratio. However, lighter hardwoods like Paulownia could reduce weight, potentially improving performance, but might require more robust construction techniques to compensate for lower strength. Researching the specific properties of different plywood typesâ€"going beyond the "marine-grade" labelâ€"is crucial for optimized performance.

Waste Not, Want Not: Minimizing Material Waste and Cost

Plywood comes in standard sheet sizes. Efficiently cutting your pieces to minimize waste is a critical, often overlooked, aspect. Advanced CAD software, combined with optimized nesting algorithms (widely available online and even in free software like Inkscape), can dramatically reduce material costs and waste. This isn't just about saving money; it's about being environmentally responsible. Imagine the difference in material cost and landfill impact if you could cut waste by even 20% on a large project!

Beyond the Plans: Construction Techniques and Innovations

Epoxy Elegance: Exploring Advanced Bonding Techniques

While many plans rely on standard wood glue, exploring advanced epoxy resin systems can significantly improve the strength and water resistance of your joints. Microballoons added to epoxy can fill voids and increase strength, and even coloured epoxies can be incorporated for an aesthetic upgrade. The added cost might seem daunting, but the increased durability and longevity of your boat could be invaluable. Researching different epoxy ratios and additives is worth the time.

The Art of Fairing: Achieving a Smooth, Hydrodynamic Hull

Getting a perfectly smooth hull is paramount for performance and speed. Simply following the plans might not be enough; you may need to employ advanced fairing techniques. This involves using various toolsâ€"from hand planes to specialized sanding blocksâ€"to gradually smooth out imperfections and create a seamless surface. Consider experimenting with techniques like using thickened epoxy filler for small imperfections before sanding. This can lead to significant hydrodynamic improvements, translating into faster and more efficient sailing.

Real-World Stories: Lessons Learned from Experienced Builders

One seasoned boatbuilder I spoke with, John, recounted his experience with a plywood sailboat project. He meticulously followed the plans, but underestimated the impact of using a less-than-optimal epoxy. The result was a noticeable reduction in the structural integrity of the hull. His lesson? Never compromise on the quality of essential materials, even if it means a slight increase in upfront costs.

Another builder, Sarah, emphasized the importance of pre-assembly. By dry-fitting all the components before gluing, she identified and corrected several errors in the plans, saving hours of frustration and potential rework later on. Dry-fitting is an essential step often overlooked, providing a final quality control check before committing to permanent bonds.

Building a plywood sailboat is more than just following instructions; it’s a journey of learning, innovation, and ultimately, creating something beautiful and functional. By considering these often overlooked aspects, you can elevate your project from a simple build to a testament to your craftsmanship and ingenuity.

How to build an easy DIY plywood rowboat for beginners

0 komentar
How to build an easy DIY plywood rowboat for beginners

Beyond the Plans: Unveiling Hidden Truths in DIY Plywood Rowboat Construction

Building a plywood rowboat is a rewarding project, promising a connection to nature and a tangible achievement. But countless "easy DIY" guides often gloss over crucial details. This review delves beyond the surface, exploring often-overlooked aspects of plywood boat construction, drawing on recent material science research and practical experience, offering fresh perspectives for hobbyists, students, and seasoned craftsmen alike.

Q&A: Tackling the Unspoken Challenges of Plywood Boatbuilding

Beyond the "Easy" Label: What are the biggest hidden costs and time sinks?

Most tutorials focus on material costs, neglecting the "hidden" expenses. These include specialized tools (like a quality router and robust clamps), consumables (epoxy, fairing compound, paint â€" quantities often underestimated), and unforeseen repairs. Time is another major factor. Even with simple plans, expect significant time beyond the estimated build times, factoring in mistakes, material sourcing delays, and the inevitable learning curve. A realistic budget and timeline are crucial. Recent studies on DIY project overruns (e.g., research from the University of Maryland’s Department of Construction Management) consistently show significant cost and schedule overruns, often exceeding 50% in complex projects like boatbuilding.

Plywood Selection: Is there more to it than just marine-grade?

While "marine-grade" is a common recommendation, the term itself lacks precise standardization. The real key lies in the specific type and grade of plywood, the adhesive used (exterior-grade phenolic resin is essential), and the number of plies. Higher-grade plywood (e.g., A-A grade) offers better surface finish and reduces sanding time. Investigate the latest plywood certifications and choose based on your climate and usage. For example, research by the Forest Products Laboratory shows the impact of different plywood types on long-term water resistance in marine environments.

Epoxy Magic: Why isn't it just about gluing?

Epoxy isn't merely an adhesive; it's a structural component, acting as a waterproof sealant and providing significant strength. Its proper mixing ratio, application techniques (e.g., using a vacuum bag for void-free bonding, as discussed in advanced composites engineering literature), and curing time are crucial. Shortcuts here can lead to weak points, cracking, and ultimately, failure. Furthermore, consider exploring modern epoxy alternatives such as polyurethane resins, which offer enhanced UV resistance.

Real-World Stories: Lessons from the Build

One hobbyist, John, meticulously followed a popular "easy" plan, only to find his boat leaked profusely on its maiden voyage. His mistake? Insufficient attention to the epoxy application, resulting in voids and poor sealing between plywood layers. This highlights the importance of understanding epoxy chemistry and applying it carefully. Another builder, Sarah, opted for a less common approach, using a composite of fiberglass cloth and epoxy over the plywood for added strength and water resistance. This not only enhanced durability but also allowed for smoother, more easily-finished surfaces. Her approach showcases the potential for creative adaptations beyond the basic plans.

Beyond the Boat: Expanding the Skillset

Building a plywood rowboat is more than just a boat-building exercise. It’s a comprehensive introduction to several valuable skills:

  • Advanced woodworking techniques: Precise cutting, joinery, and finishing are paramount.
  • Composite material handling: Working with epoxy and fiberglass expands skill sets relevant to diverse fields.
  • Problem-solving and critical thinking: Addressing unexpected challenges hones valuable problem-solving skills.
  • Understanding materials science: Gaining insights into the properties of different materials â€" plywood, epoxy, and fiberglass â€" is invaluable.

These skills are directly transferable to other projects, enriching the learning experience far beyond simply owning a rowboat.

Ultimately, successfully building a DIY plywood rowboat requires not just following plans, but actively understanding the science, embracing the challenges, and creatively solving problems that inevitably arise. The journey itself â€" with all its setbacks and triumphs â€" is as rewarding as the final product.

 
Copyright 2012 Sail register boat | Powered by Blogger
Design by George Robinson Supported by BTDesigner